1. http://library.creativecow.net/articles/brimelow_lee/video_playlist/video-tutorial.php
XML Video Playlist : video.xml
2. http://www.thetechlabs.com/tutorials/audionvideo/how-to-build-a-as3-videoplayer/
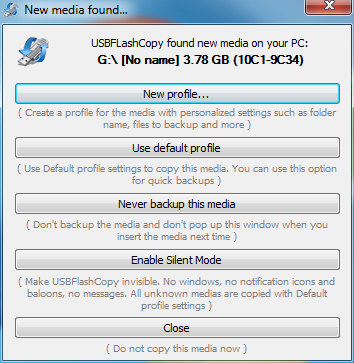 Download (300KB) | Buy ( USD 49.95 ) **You need to purchase a key to unlock Silent Mode or use for business, otherwise USBFlashCopy is free | USBFlashCopy is a small Windows utility to back up your flash drives and storage cards on the fly. It runs in the background and copies files from inserted media to a safe location on your hard drive. Free for Non-Commercial useUSBFlashCopy is free for non-commercial use. You also need an unlock key to use Silent Mode Nothing to installSimply download and run. No installation, no registry entries. SmallUSBFlashCopy is a really small utility taking no more than 300KB of space, it doesn't require additional libraries, frameworks or anything else to download and install. |
For experienced users USBFlashCopy can run completely invisible. No icons, no progress bars, no prompts, it just does the job. This feature requires purchasing a key.
1 CREATE ILLUSTRATOR SWIRL
Let’s start out in Adobe Illustrator CS3, by far the best tool for creating such design elements—and as you’ll see, hugely important in providing the actual animation paths for us also (yes, you read that right!). Create a new document called “Swirls” at 720×540 pixels, and set the Color Mode to RGB. Click OK, then using the Pen tool, create the main stem for the left side of your design. Then switch to the Spiral tool to draw the swirl on the right. With the Direct Selection tool, select the right end point of the Pen tool path and the left end point of the swirl path and go to Object>Path>Join to create a single path.

2 ADJUST FILL; ADD LAYER & STROKE
With the path selected, go to either the Toolbox or Color panel, click the Fill icon then the None icon to remove the default white fill, leaving only the black 1-point stroke (going to View>Show Transparency Grid can help confirm this is done). In the Layers panel, double-click Layer 1, rename it “Stem,” and click OK. Then click the Create New Layer icon, rename the new layer “Branch 1,” and use the Spiral tool to draw another swirl coming out from the stem, as shown above.

3 ADD LAYERS & STROKES
Continue the same steps (new layer, draw new branch swirl, check fill is None) for as many branches you would like to have coming from the main stem. Make sure the branches start at the stem as accurately as possible. (Note: To draw a swirl in the opposite direction, click once on the artboard with the Spiral tool and select the other Style in the Spiral dialog.) In this case, I’ve created a total of four extra branches. Save your document as Swirls.ai at this point, then go to Window>Brush Libraries>Default Brushes, and choose Basic RGB.

4 ADD BRUSH STROKE; ADJUST WIDTH
With the Selection tool, select all of the stem and branch elements, and click on the second brush graphic in the Basic RGB panel to apply that style. Feel free to use any of the other Brush Libraries, or indeed create your own, to suit your taste. In the Stroke panel, adjust the Stroke Weight accordingly to achieve the desired effect (1.5 pt in this example). Save the file once more, then switch to After Effects.

5 CREATE MASTER COMP; IMPORT SWIRLS
Click the Create a New Composition icon at the bottom of the Project panel, name it “Little Swirls,” and set it to NTSC D1 Square Pixel (720×540) for consistency. Set the length to 8 seconds or so, and click OK. Now, double-click in the Project panel to bring up the Import File dialog, locate Swirls.ai, choose Import As Composition - Cropped Layers, and click Open. Double-click the new Swirls comp in the Project panel to open it. Go to Composition>Background Color and choose white so you can see the swirl elements.

6 EDIT ORIGINAL IN ILLUSTRATOR
Believe it or not, you’ve done the hardest part of the project, and have also unknowingly created the animation paths that will “reveal” the strokes perfectly. Select the main Stem layer in the Timeline, then press Command-E (PC: Ctrl-E) to Edit Original back in Illustrator. Once in the program, go to View>Outline—this is how we want After Effects to see our path shape, as we’re going to copy and paste it. Due to the fact we have a custom brush applied, however, this will most likely not work. So…

7 REMOVE STROKES; COPY & PASTE
Press Command-A (PC: Ctrl-A) to Select All of the lines, go to the Color panel, click the Stroke icon, and click the None icon to remove the brush stroke. As long as we don’t save this document, our brush strokes won’t be affected. Now target just the Stem layer, and press Command-C (PC: Ctrl-C) to Copy the path into memory. Switch back to AE, and with the Stem layer still selected, press Command-V (PC: Ctrl-V) to Paste the path as a mask shape onto the layer. Double-click on the right side of the path in the Composition panel and drag to align with the brush stroke. Press Enter when you’re done.

8 REPEAT PROCESS(ES)
Now switch back to Illustrator and do the same process for the remaining strokes: Target one of the paths in the Layers panel, copy it, switch to After Effects, select the corresponding layer, paste the path as a mask, then nudge it into position if necessary. When all the paths have been copied and pasted, switch back to Illustrator, close the file, and do not save the changes.

9 ADD STROKE EFFECT; ADJUST
Starting with the stem now, we can create one animation technique that can be re-used on all the other layers. Select the Stem layer and go to Effect>Generate>Stroke; a white stroke will appear on the layer. In the Effect Controls panel (ECP), you’ll see that Mask 1 is selected as the path being stroked. Adjust the Brush Size and Brush Hardness until the original black line is hidden; in my case, a 6-pixel stroke and 100% hardness cover it just fine.

10 ANIMATE STROKE
Now drag on the End value and you’ll see your stem drawing perfectly back and forth. See, I told you it was easy, didn’t I? All you need to do now is animate the End value across time. At 0 seconds, click the Stopwatch to set a keyframe for the End value at 0%, move along the Timeline to 2 seconds, and set the End value to 100%. Then Control-click (PC: Right-click) the second keyframe and choose Keyframe Assistant>Easy Ease In. You’ll notice the line is actually erasing itself at this point, but that will change in the next step. Note: Depending on how you created the shape, you may need to animate the Start point instead.

11 SET MASK
Very cool indeed! There’s one more step, however. If you go to Composition>Background Color and set the color to a blue, you can see all we are doing is using a white stroke to hide/reveal a black stroke—which is no good if you intend to composite these swirls on a different background. Back in the ECP, simply set the Paint Style to Reveal Original Image—perfect! You’re animation should now be drawing the line instead of erasing it, as well.

12 COPY & PASTE EFFECT; ADJUST TIMING
Now the same Stroke effect, including keyframes, can be re-used for the branches. In the ECP, select the Stroke effect name at the top and Copy it. At 0 seconds in the Timeline, select the branch layers and Paste. Now, simply click-and-drag the keyframes in the Timeline to adjust the timing for each branch so that they start to reveal just after the stem has passed by, and your swirl animation is complete!

13 COMPOSITE BACKGROUND; CHANGE COLOR
Now switch to the initial Composition you created in Step 5. Import a textured background image, such as this one from iStockphoto.com (#3855804), drag it into the Timeline at 0 seconds, and scale accordingly. Then drag your animated Swirls composition over the top, and duplicate, scale, position and rotate accordingly. Now, go to Effect>Generate>Fill, change the color to white, and set the layer Blend Mode in the Timeline to Overlay. Repeat this step for each of the Swirls comp layers in the Timeline.

PHOTO CREDIT: ©ISTOCKPHOTO/BULENT INCE
14 ADJUSTMENT LAYER; GLOW
At 0 seconds, go to Layer>New>Adjustment Layer, then Effect>Color Correction>Tritone. In the ECP, change the Highlights swatch to a slight off-white, and the Midtones swatch to orange. Now choose Effect>Stylize>Glow, and set the Glow Threshold to 100% (experiment with the settings based on the background you’re using). Hit 0 on the keypad for a final RAM Preview, and your simple, single-line vector swirls from Illustrator look completely different now, not to mention that their own paths essentially self-animated! Use them creatively. Enjoy!


It would actually be pretty hard to make this tutorial any more detailed. Making custom Illustrator brushes couldn’t be easier. However, there are a couple things you do need to know first. There are 4 types of brushes that you can create in Illustrator. (Calligraphic, Art, Scatter, and Pattern) I will be showing you how to make an Art Brush. I haven’t explored the other 3 in as much detail, but as soon as I have I will post about it. For now, I will show you how to make an art brush, and you can experiment with the other brush types in the same fashion, the only differences are settings, and how the brushes act when applied.
First, open a new Illustrator document and make any shape that your heart desires. You can literally make ANY shape into a brush, even a square if you feel like it. Here’s what I made. A couple of bars and some blocks scattered about. There is no need to worry about shapes at this point because once you try this a few times, you will get an idea of how the shapes will effect your brush.

Now select all of the shapes that you want to be a brush and in your Brushes palette, click on the little arrow in the upper left, and select “New Brush.”

You will get the option to choose 1 of 4 brush types. Choose “Art Brush” and click OK.
Now you should be in the Brush Options. IMPORTANT: Make sure you select “Tints” as the Colorization Method. This allows you to change the color of the brush as a stroke color. If you don’t select Tints, your brush will always be the color it is when you create it. There are lots of other settings you can play with here, including the direction of the brush stroke. Choose your settings and click OK.

You should now see your new Custom Brush in the Brushes palette.

Now create a shape to test your brush. I used a circle, like below:

Now make sure you have the stroke selected in the tools palette, and click on your Custom Brush in the Brushes palette to apply it to the circle to see what you get:

Custom Brushes are an easy way to get shapes that would have otherwise taken you hours to draw by hand. Now that you have your brush, you can start applying it whenever you want, and adjust the stroke size to get the effect/shapes you want. In the image below, all I did was use the same brush I just created, duplicated it, overlapped it, and adjusted scale, colors and stroke sizes. You can make multiple brushes in order to get way more complex, and the more you try it, the better you get. Seriously, this took about a minute with one brush (made from simple rectangles!). Imagine what you can do if you spend some time experimenting?

Although static graphics is obviously much easier to scan and therefore can be easily perceived, motion graphics brings dynamics and life into otherwise static content. Animation can help designers to convey a deeper meaning with the use of various video-techniques. It can also provide a better data visualization than the static graphics. How and where you use it in real-life situations is totally up to your talent and your abilities to express yourself.
Motion graphics are not only created using digital techniques; also traditional animation and special effects techniques are used. However, digital techniques help to minimize production costs and achieve nice results with less effort. For example, the Juno opening sequence was a hand-made motion graphics which took painstakingly long time to finish.

A couple of weeks ago we presented Best Tutorials For Cinematic Visual Effects. In this post we present a collection of useful Tutorials for motion graphics – created with the use of digital techniques. These tutorials focus on the designing skills of a motion designer and not on the modeling or the animation. You can use these techniques to create stunning motion graphics or improve upon these ideas and come up with your own creative ideas that will be truly remarkable. Most of the tutorials are from similar sources, because of its quality and usefulness.
Stormy and Electric Type Reveal
This Adobe After Effects tutorial uses a form plug-in to create a mysterious and electric type reveal.

Text Explosion
Create text explosion with the help of 3DS Max and Adobe After Effects software. Part 1 and Part 2

Old Paper Look
Create an Old Paper texture to add old look to the title animation using the Fractal Noise Effect in Adobe After Effects.

Dunk Your Logo in a Wave World
This Adobe After Effects tutorial uses Wave World plug-in to achieve this effect.

Sound Reacting 3D Waveform
Create a sound reacting 3D waveform animation in Adobe After Effect using built-in plug-ins.

Stunning Website Demo Presentation
This tutorial shows how to create a clean and elegant solution to show off your website.

Forging Fire
Give a forging fire effect to title in Adobe After Effects.

Particolor
In this After Effects tutorial you will learn to create colourful dynamic particles by controlling their motion using Trapcode particular.

Elegantly Handwritten Text Reveal
This Adobe After Effects tutorial will teach you how to animate a handwritten text sequence with ink bleeding through the paper to create an elegant old-world style title reveal.

Awesome 80’s Inspired Title Animation
Design an Awesome 80’s Inspired Title Animation in Adobe After Effects.

Ethereal Morphing Letter Canvas
This tutorial shows how to use the built-in radio waves plug-in to create an incredibly beautiful and ethereal animation of morphing letters.

Beautifully Animated Faux 3D Flower Scene
In this tutorial you will learn how to create and animate a beautiful 3D flower that can be a design element of any motion graphics piece.

Chromatic Aberration
Learn how to virtually create Chromatic Aberration - The failure of a lens to focus light rays to the same point. Images obtained from the lens having chromatic aberration are always colourful.

iPod Commercial
Create iPod ad in Cinema 4D using tracer tool and later composite the final video in Adobe After Effects.

This 2 part tutorial you will learn to create some beautifully organic light streaks that are used for logo reveal. This tutorial makes use of expressions in After Effects. Part 1 and Part 2

Dreamy Logo in the Clouds
This tutorial shows how to use a particle generator to create 3D clouds and use them as a transitional device to reveal a logo.

Cinematic Opening Title Redux
This 2 part tutorial uses freely available scripts and expressions to create stunning Hollywood movie style opening. This is deep skill based tutorial which will show some techniques to harness a large amount of text and quickly format and animate it in a cinematic style and use scripts to split up and animate a logo into hundreds of pieces. Part 1 and Part 2

The Juno Opening Credit Look
Adobe After Effects tutorial to create famous handmade juno opening sequence.

Cinematic Opening Title
Another Adobe After Effects tutorial to learn how to create a beautiful cinematic opening title using Trapcode Form.

Mac OS X Leopard-style Aura Effect
In this After Effects tutorial you learn how to create beautiful Mac OS X Leopard-style aura effect.

Radio Detection and Ranging
This tutorial will teach you to create 3 types of animated radar displays using expressions rather than keyframes which will help you to save time.

Lottery Balls
This Adobe After Effects tutorial demonstrates how to use expressions to generate multiple custom particles in Particular to create an animation of bouncing and floating Ping Pong balls.

Heart Monitor
Create a heart monitor display using Adobe After Effects.

Volume Meter
Create a Volume Meter that is reactive to change in sound. It uses expressions in Adobe After Effects to achieve this sound reacting motion graphics.

Flying through a tunnel
Create a flying through tunnel effect in After Effects. Also check the similar tutorial at www.maxafter.com

Automated Odometer
This tutorial will show you how to create automated odometer in After Effects using expressions.

Sunrise
Create a stylized sun using expressions in Adobe After Effects.

Dropping into water
Create an effect of an object dropping into water, using the Caustics and WaveWorld filters in Adobe After Effects.

Line Chart Diagram
This tutorial will show you to create diagram which can be animated with use of expressions in Adobe After Effects.

3D City
Using this tutorial you can create a stylistic 3D city with 2D images in Adobe After Effects.

Card Dance
Create a effect of millions of pictures flying around.

The 007 Intro
This tutorial shows you how to achieve the classic introduction of James Bond films using only basic After Effects plug-ins.

Earth Zoom
Create a cosmic Earth zoom in Adobe After Effects.

Welding Sparks
Create welding sparks effect using Trapcode particluar in Adobe After Effects.

Spin Orbs
Create a spinning orb in Adobe After Effects that self animates with times

Fun with Ink
This Adobe After Effects tutorial uses Particle World to create ink spatter elements.

Swirls
Learn to create animated swirls in Adobe After Effects.

Moving 3D Lines
This tutorial will teach you to create flowing light streams using Adobe After Effects.

The Blue Planet
This tutorial will teach you to create an earth in After Effects with atmosphere, rotation, solar eclipse and lighting. This tutorial uses CC sphere plug-in to convert flat map to 3d earth.

Car Racing Scene
Create a scene of cars racing down a road towards camera from photographs. Part 1 and Part 2

Medical Zoom
This 3 Part tutorial will show you how to model a blood cell (3D Max) and use it in After Effects to create the effect, where a camera goes inside a person`s body. Part1, Part2 and Part3

Dead Planet
This tutorial is similar to “The Blue Planet ” which will show you to create a dying planet with visible lava and cracks.

Planet Explosion
This tutorial will teach you to create explosion using shatter effect in After Effects.

Fancy Title Plate
Create a beautiful fancy 3D Title in Adobe After Effects.

Flaming Chrome Text
Creates flaming chrome text in Adobe After Effects using the glow and liquefy effects.

Growing 3D Vines
This tutorial will teach you to create growing 3D vines over a water floor in 3D Max and later composite it in After Effects.

Smokey Type Effect
This tutorial will teach you to create Smokey Type animation in Adobe After Effects.

Colorful Universe
This tutorial Uses expression in Adobe After Effect to create a 3D dynamic space world with light streams.

Breathtakingly Awesome Rain Scene
Adobe After Effects tutorial shows how to create the dramatic slow motion rain drops falling scene. Part 1 and Part 2
![]()
Organic Mesh
This tutorial will teach you to create an bloody wet organic mesh using 3DMax.

Spray Paint and Stencil Effect
In this tutorial you will learn how to create a spray paint effect using After Effects.

Shiny Ring
This tutorial will teach you to create a silver ring in After Effects with a particle wipe and some expressions.

TV Screens
This Adobe After Effects tutorial will teach you to create many TV screens placed in a grid. Also some optical effects are added to make it look interesting.

DVD Motion Menu Design
Major difference between this tutorial and the other DVD menu design tutorial is that it shows you create interactive menus from pen-and-paper sketches.

Graffiti Writing
This is an awesome After Effect tutorial to simulate graffiti writing on a wall in 3D along with some paint splatter elements.

Ink Bleeding Effect
Create an ink bleeding effect. This tutorial makes use of Photoshop, Illustrator and Adobe After Effects with Trapcode’s Particular

Cool TV bumper
In this tutorial you will learn to create a cool TV bumper using mattes in Adobe After Effects.

Speed Particles
Create sandy like particles that fly off of text using expressions to drive particles based on speed.

3D Watch Animation
This 3 part tutorial will teach you to create a 3D Watch Animation. This tutorial makes use of Adobe Photoshop CS3 Extendend with Google 3D Warehouse Plug-in and Adobe After Effects. Part 1, Part 2 and Part 3.

Droste Effect
This tutorial demonstrates the use of new Pixel Bender plug-in to obtain “Droste Effect”.

Retro Style
Learn how to create a vintage retro style.

Building and animating a CGSnake
Learn how to create a animated snake in Adobe After Effects based on a “chain rig”.
![]()
3D Toon on Paper
Transform your hand drawn sketch from paper to digital animation.
![]()
Fracture Design
Use expressions and scripts to create a distressed title in Adobe After Effects.

